- Details
- Category: Kombucha
Many kombucha purists often drink plain kombucha tea, which does the job most of the time, but some of us are looking for something a bit stronger.
Kombucha naturally contains <1% alcohol as a product of the yeast fermentation. The SCOBY contains many different types of yeast that act as a source of ethanol for consumption by the bacteria. The multitude of bacteria present generally consume alcohol and sugars to produce acetic acid, gluconic acid, and a few other weak acids that all give kombucha its flavor. When creating high-alcohol content kombucha or kombucha wine we aim to remove as much bacteria as possible to allow the alcohol from yeast fermentation to accumulate in solution.
Luckily, this process has already been perfected by wine makers! Wine yeast added to kombucha (with the right concentration of sugar) should ferment for up to two weeks and give a reasonable alcohol concentration while maintaining the kombucha flavor. Not everything has to be complicated...but we sure can make it way.
Where to start
Always start by Googling what you want to do. Chances are somebody has done it already and their work is in need of some revision. In this case, somebody is already making and selling high-alcohol content kombucha (I'll probably call it HACK from now on instead of kombucha wine). Boochcraft says they are the first hard kombucha, but they also teach you how to be not-quite-the-first maker of hard kombucha! Don't let the search stop there...many other people post about how to make kombucha wine. Here is the most comprehensive guide that I have seen. All the other content they have on their site is just as helpful, I highly recommend turning to them for a greater depth of knowledge.
So with a good layout of the general process, how do we choose which wine yeast to use? First we must turn to Mayer-san. If you haven't seen the name elsewhere on the site, Eric Mayer is the neighbor to my childhood home. I've learned a lot about gardening, making wine, beer, yogurt, all sorts of things. He pointed me to two white wine yeasts, both very common. I purchased both Premier Blanc and Côte des Blancs yeasts from Label Peelers (they offer free shipping).
Batch 1
Started 3/21/2020, bottled TBD
My plan is to do a small first batch since I don't have a hydrometer to test for sugar content or expected alcohol. I currently have one gallon of kombucha that started only a week ago from starter liquid. The SCOBY is a good size on top and there is definitely strong kombucha flavor to the brew. My main concern is that the starter liquid will be active enough to create a new SCOBY and the bacteria culture will overpower the yeast. I did my best to remove all of the SCOBY, but I now regret not emptying and refilling the carboy.
I did not have a lot of strawberries, but enough that the flavor should come through behind the kombucha flavor. I removed the stems and diced them into small pieces. Following the advice on this blog to start processing the strawberries. I added all of my diced strawberries to a bowl with 1 cup of sugar. After this had rested for several hours, I started on the yeast. Côtes des blancs yeast produces a fruity flavor and is recommended for ciders and fruit wines, so that seemed like a better choice to start compared to Premier Blanc. To bloom the yeast, I followed the package instructions to add to warm water and set for 20 minutes. The yeast foamed as it was supposed to, so I added it to the main carboy with the sugar and strawberry slurry. To make sure I got all of the sugar and strawberry juice I added 1 cup of warm water to the bowl and rinsed it into the carboy. My current overall volume came to 1 gallon and 4 cups or 5 quarts. I had considered adding more tea instead of warm water, but the payoff did not seem worth it. I will consider adding more fresh sweet tea in the next batch.
Observations
Immediately, the mixture started to fizz from the activation of the new yeast. After settling for an hour, I noticed a thin film on the surface. The strawberries are floating which obstructs my view, but it looks very much like a SCOBY. I will continue to watch out for that, even though I have absolutely no plan to control it.
As of 3/28/2020
One week later, the top layer still looked like a SCOBY, but I am less fearful of that now. The strawberries faded to off white a few days ago, no change in their buoyancy. The smell does not seem as acidic as normal kombucha. A hint of alcohol scent comes through, so it seems like the alcohol is not being consumed by bacteria. The rate of gas formation has changed over time, but it has not slowed as much as I expected.
The data for the rate of bubbles is below.
4/4/2020
Same update as last week. Looks about the same as last week. It seems that more sediment has fallen to the bottom of the carboy, but difficult to see clearly. The liquid is still very hazy.
- Details
- Category: Kombucha
Attempted Flavors
I you chose the right tea base, you may find that the plain kombucha has enough flavor for you! Every time I test the main fermenter I want more, and more! A second fermentation with sugar will help to add a little zip, but there is enough natural carbonation to make it pleasurable. Most hobbiests that I find that use a continuous fermentation drink straight from the vessel with no second fermentation. I may switch to this in the future, or I will test adding fruit juice to plain kombucha tea with no extra carbonation.
Generally any fruit or berry flavor is safe to try. I have had success with most flavors I've tried, but I have to trust my other critics more than my own preferences. Recipe and kombucha websites can be sort of helpful, but they mostly also recommend mixing your favorite fruits in whatever quantities you desire. Most of the mixtures below were repeated several times in slightly varied ratios.
Plain Ginger
If you just want a little more bite than the plain kombucha, a few ginger coins or slices will liven it up. Adding only one coin per pint doesn't make a noticeable difference, so feel free to go heavy on it! You can always dilute your product with more straight from the main fermentation vessel. I don't find that it is worth my time to cut any ginger if that is the only flavor, but maybe you will! Remember to still add sugar for the second fermentation.
Ginger Blackberry (per pint)
An easy flavor that matches what people would expect. The color is really strong and attractive, but normally looks like it will have more flavor than it does.
- 8 black berries, sliced into quarters (will give plenty of flavor, can go down to 5 or 6)
- 2 small coins of ginger, sliced into thin sticks or crushed with the side of a knife
- 1 tsp of sugar or honey
Start with one ginger coin and step up from there. To crush the ginger coin, it must be close to 1/4" thick. Put the flat side of a knife on the coin and start to put your weight on it until it 'pops'.
Can replace blackberries with any berry. Two large strawberries will add a good amount of flavor.
Strawberry Mint (per pint)
After testing with blackberries and strawberries, I find the strawberry mint goes much better together. You get more mint flavor that way since the strawberries don't overpower the herbs as much.
- 3 strawberries, sliced into quarters
- 2 sprigs of mint, bruised with the back of a knife, stems included
- One teaspoon honey (or sugar)
Two full sprigs was enough to add flavor, but I was happy with more. Strawberry is a softer flavor no matter what you pair it with, but that fits with the mint.
Can replace strawberries with blackberries, but if you go as heavy as the Ginger Berry, the mint will not be as clear. The sourness of the blackberries is not as pleasant when paired with mint.
Blackberry Thyme (per pint)
Thyme definitely adds more aroma to the brew than it adds flavor. The scent is a little overwhelming at first, but it will die down. Make sure to add less initially and test it first. Two sprigs was plenty for me.
Blackberry flavor pairs better with thyme than it does with mint. Whenever I use blackberries alone, I feel the flavor is drier. This may just be a difference in sugar content, but it always has a little more bite to it.
- 6 blackberries, quartered
- 2 large sprigs of thyme, bruised, including stems
- 1-2 teaspoon sugar
Banana Cinnamon (per half-gallon)
This is a less common flavor, but I was excited when I thought of it with a few spotty bananas waiting to be used. I figured bananas had a lot of sugar content but didn't look it up ahead of time. They have WAY more than berries, possibly just because of weight and volume difference. The fermentation was very active and the bottles were super foamy when filtering the solids out. The resulting brew was not strong with banana flavor but was very sweet and had a great cinnamon flavor.
- 2 full bananas (slightly brown/spotty), thinly sliced up or smushed if you have narrow bottle openings
- 2 tsp ground cinnamon sprinkled on bananas or directly into bottles
- 3 tsp brown sugar
I mushed mine up the first time and found that it was hard to remove since the entire lump joined together at the surface. Slicing several times may be easier for you. 2 tsp of cinnamon gave a good amount of flavor, but feel free to go stronger. The cinnamon settles to the bottom of the bottle after a while, but if you turn the bottle a few times before drinking, it is noticeably different.
- Details
- Category: Kombucha
So you probably saw a few YouTube videos about making kombucha or you've gotten sick of paying $3 per bottle.
Either way, brewing kombucha isn't complicated, but we sure can make it that way.
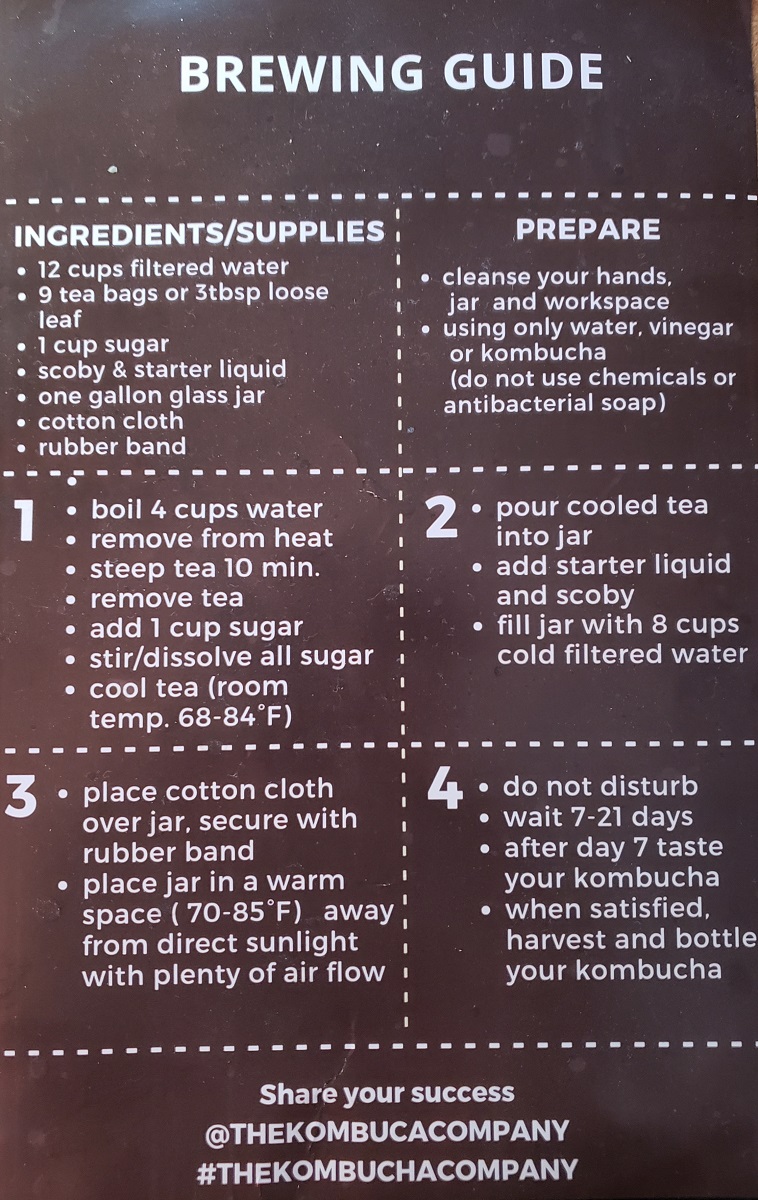
You definitely need some supplies to get going, but it is all pretty accessible. I have a Shopping List to give some examples, but finding a nearby brewing supply store is a great strategy to find what you need. I was able to get some supplies from a friend, but that isn't always the case. If you want to jump right into seeing what I did, take a look at my kombucha log.
Finding a SCOBY/Starter culture
"There is something immensely satisfying knowing that I have a literal army of microbes, each working for me free-of-charge!" - Mayer-san
A SCOBY (Symbiotic Culture Of Bacteria and Yeast) is the life force of kombucha. The bacteria consume sugar and alcohol to create acetic acid (responsible for the vinegar taste) and the yeast produces alcohol and carbon dioxide. Both need to be present in significant quantities to process your sweet tea into kombucha. It is possible to create a new SCOBY "child" from a bottle of kombucha, but that isn't always reliable (read here on how that can be done). I wanted to get a SCOBY from a local brewery, but after calling around I found that wasn't an easy option. I ordered a starter from The Kombucha People and was surprised how large the pellicle was! It also came with enough starter liquid to make one gallon.
The directions from the packaging (below) matched closely with what I had seen online, so I just went with it. I don't have a wide opening jar, but a narrow-mouth 3-gallon carboy, so I had to cut my SCOBY in half for it to fit inside...that's okay!
Where to keep it
You want your kombucha to hang out a little above 80°F. Here is a closer look at the relationship with temperature. I started with mine near a heater vent in the winter to add some extra heat, but wanted a temperature controller as soon as I could manage. The first several cycles were all with it sitting near the heater and I had no problem with mold or slow fermentation. Make sure to keep it out of direct sunlight, but a bright room is okay (all your dark rooms are probably quite cold anyway).
Every reference I see says 7-21 days of fermentation...that seems like a long time
It is a long time! If you are getting into this since you drink a lot of booch from the store, you are probably used to strong flavors with a good deal of sweetness. There was no way that I was waiting more than a week to try my first pull...so I tested it after exactly 7 days. It was delicious! Way better than expected for 'unflavored' tea (the flavor will heavily rely on what black tea you use as a base). I had certainly planned on flavoring every batch with a second fermentation, but could've kept the first batch unflavored and been very satisfied.
Unless you are looking for a very strong acidic flavor, or a heavier yeast flavor than you get in 7 days, one week is probably close to enough. You can always add sugar after you ferment to adjust for the acidity you achieve. After that first batch, I have stayed mostly on schedule for feeding and pulling product every 3 or 4 days.
The Second Fermentation (F2)
To bump up the zippiness of your kombucha, you should do a second fermentation that increases the pressure of the container instead of draining it all. To get carbonation (dissolved CO2) you need to keep the kombucha in a strong container with a good lid for a few days. GT's Kombucha from the store comes in great bottles if you don't feel like purchasing flip-top bottles. These are screw top and can get extremely tight with pressure, and also are not as safe as other options but make for a good start.
You can find my attempted flavors here. Add whatever fruit or juice you want to flavor with and add 1 tsp. sugar per pint to maintain activity. The culture present in the liquid (don't add any SCOBY) will generate carbon dioxide and increase the pressure in the bottle so some of the gas will dissolve in the liquid and carbonate the kombucha. Three or four days is normally plenty of time, and you can pop the bottles in the fridge to dissolve more gas in the liquid. The culture will have very little activity in the fridge so don't worry about them exploding if they are well below room temperature.
Storage and Time Frame
Once you complete the second (optional) fermentation, you can store your kombucha for quite a while. It will happily sit in the fridge or even at room temperature for several days before changing flavor at all. The culture should stay healthy for much longer, but the risk for contamination increases if you leave it at room temperature for too long. The bottles do not have an abundance of bacteria and yeast like the main fermenter does, so competition from outside sources is more likely. Chances are you will want to finish your bottles before they even start to go bad anyway.
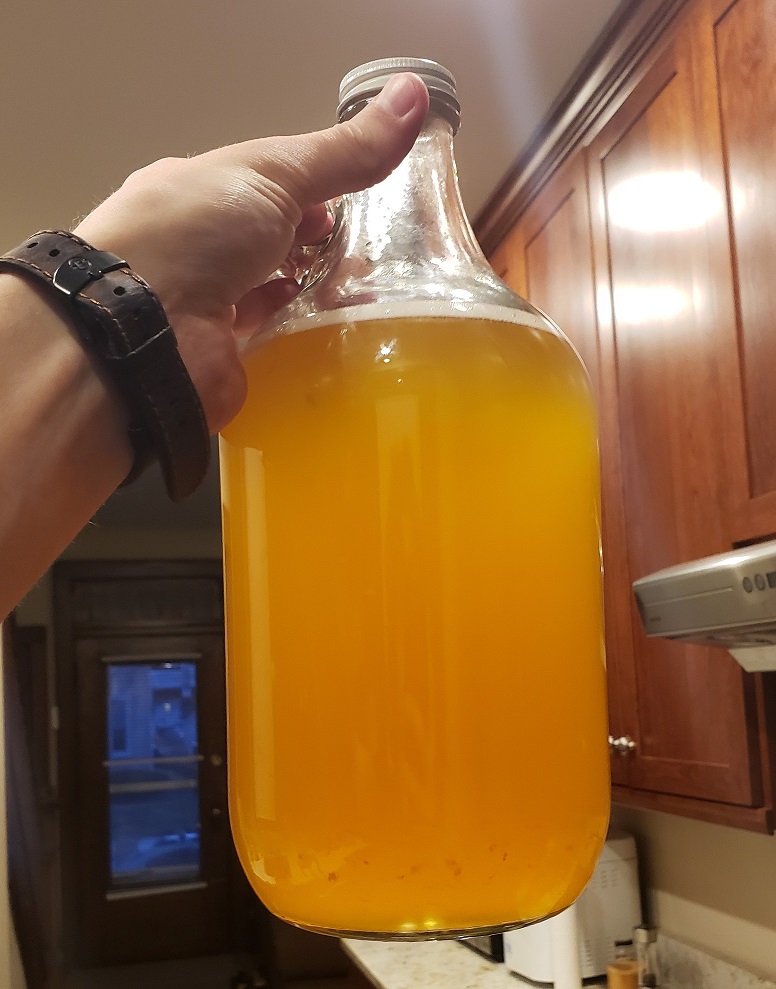
Pulling a harvest into a half gallon growler is much simpler than individual bottles so I prefer to only flavor one large container. This is not convenient for travelling with a drink, but I just pour from the growler into a bottle whenever I feel like it. Using a large container will mean less fizz (opening more often) but saves time for flavoring.
Continuous or batch fermentation?
You can produce a lot of kombucha consistently with continuous fermentation because you could harvest just about any day and have a well progressed culture. The sugar will vary day to day and will be very high after a refill, but the age of the culture is more consistent than with a batch operation. For batch operation you could empty and refill your vessel every week or two and save a small amount of starter liquid, but that means you are locked into waiting most of that time for a taste. I have been happier pulling a fraction of my main fermentation every few days and refilling than I would be operating batch-wise and having to wait longer between harvests.
- Details
- Category: Kombucha
Benway's Booch - Constant Comment
For my first batch, I wanted a tea that would provide flavor if I didn't have a successful F2 so I chose Constant Comment. I hope the spices will provide some bite to the tea so I don't have to add ginger to every batch, but Constant Comment is not easily available in loose-leaf, so I may switch later.
If you want an overview of the process first, head over to Getting Started with Kombucha. Either way, I hope to provide enough basis for you to get a batch of booch going!
First Harvest
I followed the instructions from the Kombucha People loosely and plan to increase volume later. Boil 4 cups of water and steep 8 tea bags for 4 minutes (can go longer if you would like). After removing the tea bags, add 1 cup of sugar and dissolve. Most guides will say to cool this down to room temperature, but that is not necessary if you add it to cool or cold water. Add the sweet tea to 10 cups of cool or cold water. As long as it is below 90°F, add the SCOBY and starter liquid and stir gently. Add the airlock and set the container in a warm place.
Most guides say to start testing the flavor after about a week, but the SCOBY that comes in most starters is very large and your desired flavor may be achieved earlier. If you don’t like very intense flavored kombucha, earlier will be better and the sugar content will be higher. I find that tasting with a ½" tube is okay. This will risk contamination, but if you have a hose clamp you can insert the tube to fill with liquid and clamp the end to pull out a small amount.
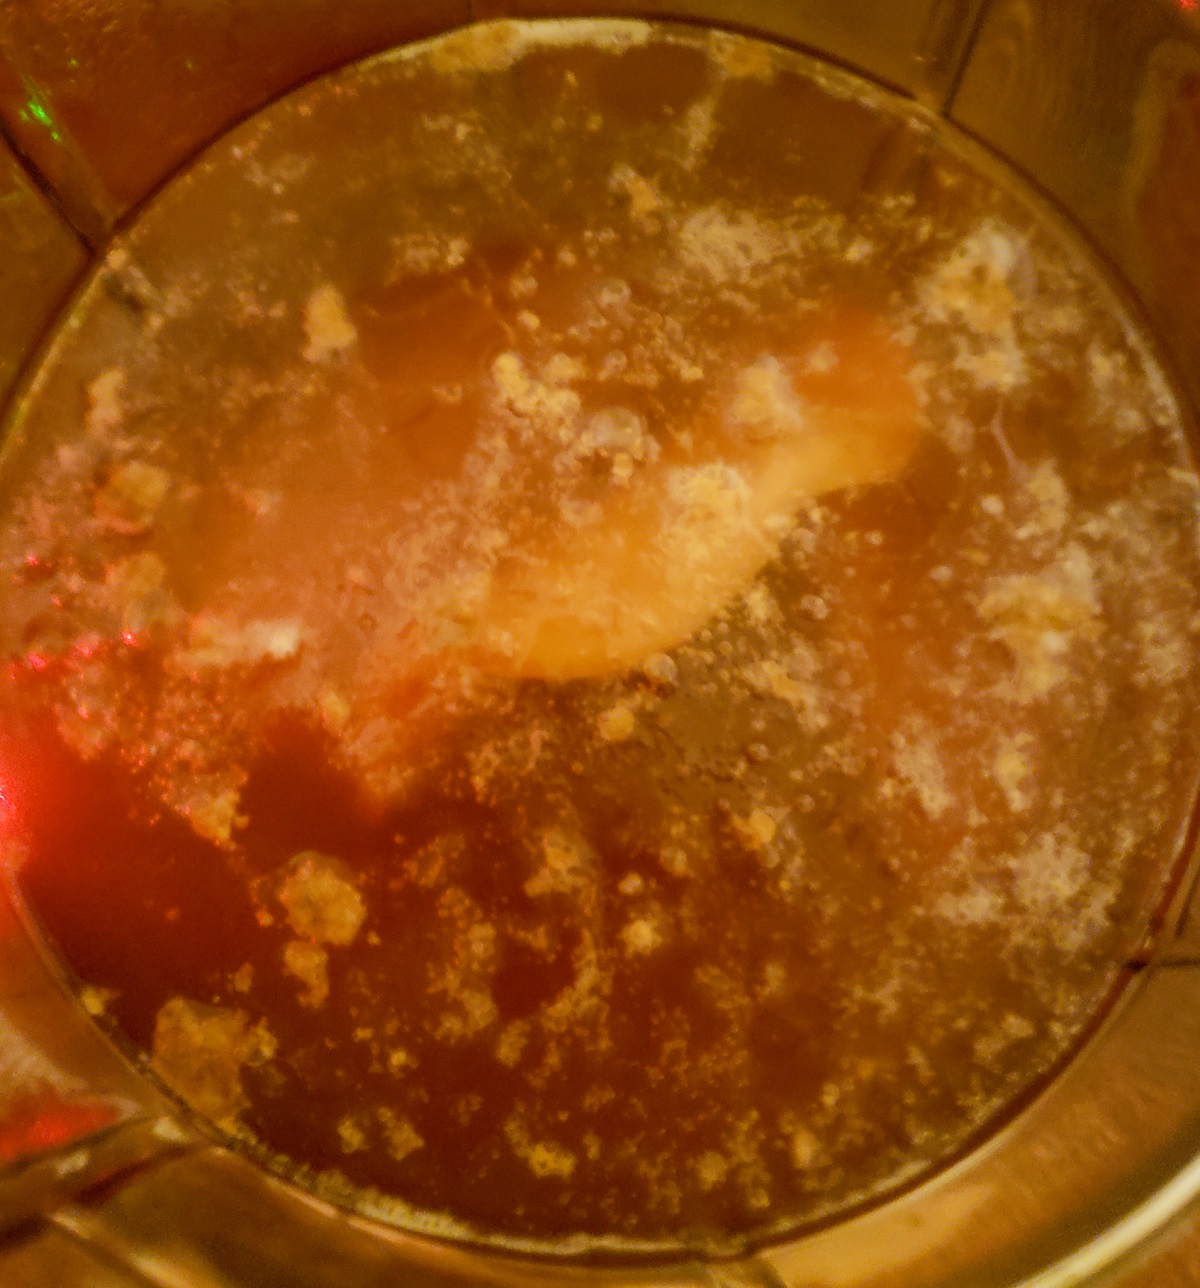
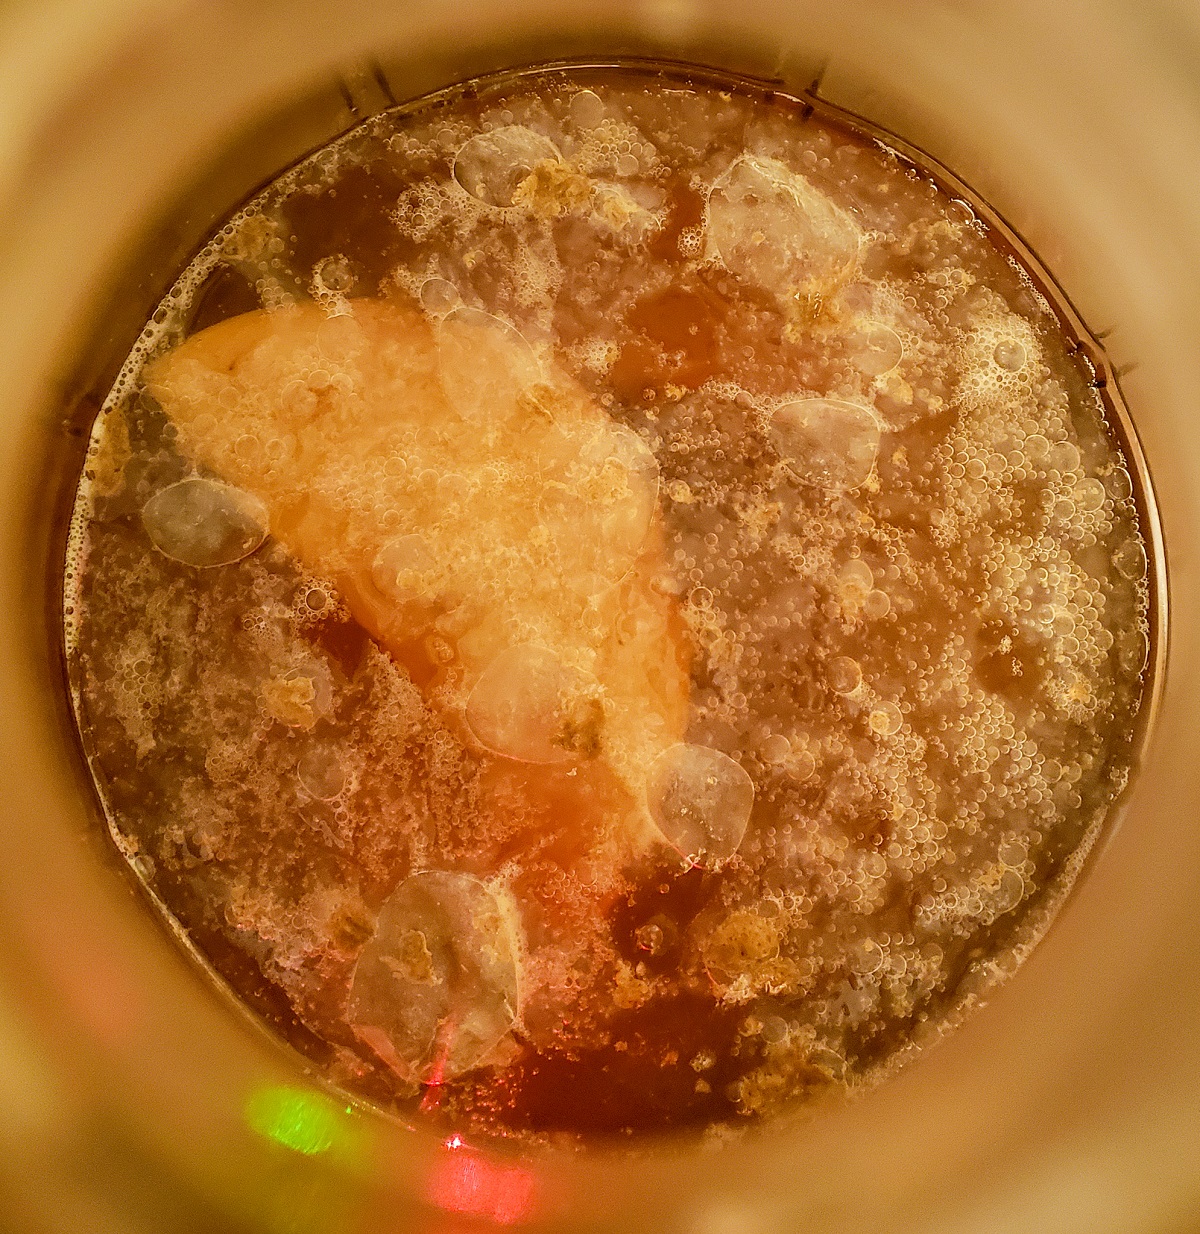
Notice the difference below of my Week 1 (left) and Week 2 cultures. The film grew very quickly since the SCOBY I purchased was large and I made sure to keep the culture warm.
My SCOBY did not float initially, but I let it go anyway and quickly found a skin growing on the surface. I tasted every couple days and thought it was delicious after 7 days, so I pulled half a gallon. My roommates and I decided to go with several flavors that matched the bottles that we already had. The GT's Kombucha work really great for the second fermentation if you don't want to buy flip-top bottles. Just be careful to burp them regularly so the caps aren't stressed too much. They will bubble up, but so far none have burst.
Flavoring

The amount of each flavor wasn't based on any website, just guessing, but it was just about right. I also added 1 teaspoon of honey to each bottle before closing. The flavored kombucha fermented for 4 days before testing. I didn't think to refrigerate them first which made a big difference in the possible fizz. All of them had a little kick to them, but the carbonation was minimal. Because I had burped them so often, they didn't get a chance to build much carbonation. From now on, I will always plan to refrigerate the second fermentation to dissolve more CO2 in the kombucha. Carbon dioxide is much more soluble in cold water than in warm, so refrigerate for at least a few hours before opening any bottles.
| Strawberry Ginger | 3 strawberries, one ginger coin | Good flavor, not super strong fruit flavor. Ginger was too light, but easy to drink. |
| Strawberry, Blackberry, Ginger | 2 strawberries, 4 blackberries, one ginger coin | Stronger fruit flavor, the blackberry's tartness covered the strawberry. |
| Blackberry Ginger | 6 blackberries, one ginger coin | Good flavor, ginger taste on the back-end |
| Blackberry Ginger | 8 blackberries, one ginger coin | Better fruit flavor, going with this concentration if possible in the future. Takes up a lot of space in the bottle |

Notice how much the caps bulge...this is before refrigeration, which should bring them down some
To refill the fermentation vessel (for continuous operation) follow the same instructions from the initial fill. I wanted to keep increasing volume so I refilled with a full gallon instead of just going back up to where I started. Keep the same ratio of sugar in the sweet tea mixture.
Later Harvests
All harvests after the first were slightly different. In an effort to increase carbonation, I made sure to mix the vessel very well before pulling any product from it. The yeast tends to sit at the bottom of the container so mixing that up is essential while the bacteria generally is well incorporated or on the solid pellicle at the top. This made a big difference with the resulting product and meant that I didn't have to move the tube up and down in the container to get a good mixture. You should not be able to see clearly through your final product.
I generally tried to harvest every 3 days, but this schedule was not very tight. All harvests were after at least 3 days, but some extended to 5 days. The flavor changed noticeably in this time and definitely had more body after 5 days, but the sugar content was clearly lower. It is much easier to pull a half gallon at a time so I maintain the same volume every time.
I will continue to harvest this Constant Comment Kombucha, but will be expanding to attempt to create a high alcohol brew...
Much Later
After measured success creating regular and flavored kombucha, I got stuck in a rut and didn't progress much further. College was online for the spring of 2020 and I got a bit sick of my hobbies. After graduation, I moved to Iowa and did not start work on kombucha immediately upon arrival: this proved to be a big mistake. I should have learned my lesson earlier when I tried to share some of the SCOBY with a friend and had great difficulty removing it from the container. I am now in the same situation. The SCOBY has grown immensely since my move and is now far too large to fit out of the carboy. I will just buy a cheese wire and hope this allows me to slice up the SCOBY enough to remove it. Maybe I will finally invest in a wide mouth container...
Even later (June 2020)
I didn't buy the cheese wire: I don't eat cheese. I worked for a long time to get that SCOBY out. My main tool was a long screw driver with some string that I used to tie a slipknot around the mass. By pulling pretty hard I could either cut the SCOBY into smaller pieces or just pull out the chunks. The whole process still took me at least 30 minutes with cleanup. Moral of the story: use only widemouth fermenters!
I saved some of the culture and kept it in a large mason jar that is mostly water. Every month or two I will pour some sugar in, barely taking the time to dissolve it. The effort in maintaining an active culture is just not worth it to me anymore, but I keep it around in case I have any friends that want a piece (remember that SCOBY wasn't free).
- Details
- Category: Kombucha
Starting Kombucha
- SCOBY starter
- Glass jug (heavily recommend buying from a brewing supply store instead of ordering online)
- PVC tubing (any size will work for siphoning, but don't go too large, >1/2")
- Airlock (Optional, can use a cloth to cover the opening)
Advanced Kombucha
- RED STAR Yeast
Arduino
- Very full starter kit for Uno
- Heating pads
- 36W Power Supply
- Wire nuts
- Various high-gauge wire
- Soldering Equipment (optional)
- Multimeter