- Details
- Category: Yogurt
There's probably a reason that I have never heard of tea-flavored yogurt, but I want to find out why for myself!
I definitely did not get any requests for this from my Review Board (roommates) but I have a LOT of tea, and a LOT of time (but not too much milk).
I realize that I always recommend searching online for info before starting a new experiment, but I am starting to lose trust in most blogs that mention ANY sort of microbiology. Not claiming that I know more than all of them, but many seem to recommend baseless actions...
Earl Grey Yogurt
Probably not the best choice to go along with yogurt since it already is a sort of bitter tea, but I have a large tin so that seems the best place to start. I drink Earl Grey regularly, but much prefer Victorian London Fog which is similar, but also has lavender.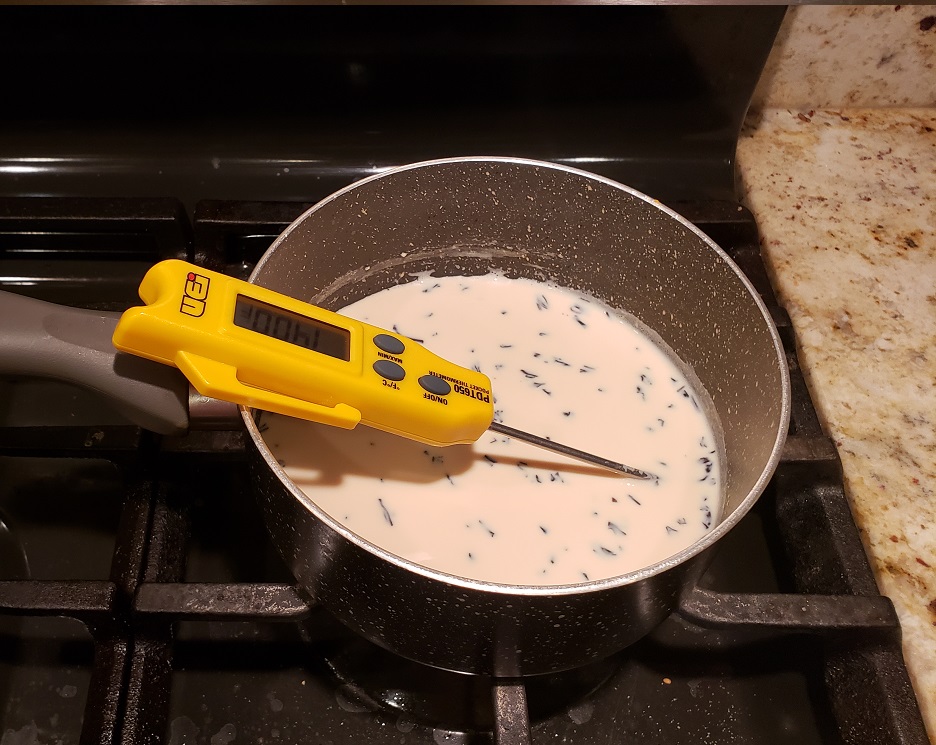
Follow very similar steps as when creating regular plain yogurt. The only difference is when prepping the milk before adding the culture. I used only 1 cup of milk (actually 215 g so probably less than a cup) to conserve my ingredients. Assuming the tea would not provide a strong flavor, I used just over what I would normally use for a cup of tea. I added 2 heaping teaspoons of Earl Grey loose leaf tea or 3 teaspoons of Victorian London Fog (two batches) to the milk just as it reached peak temperature (185°F). Earl Grey tea is on the bitter end of tea already, so I made sure to steep for only 3 minutes in the milk. The milk changed color immediately, but did not get very dark. I poured the milk through my tea strainer and returned it to the pot to cool.
I sometimes will use a water bath to cool the milk down, but find that I can clean the kitchen some while I wait, so maybe use this time to try to give yourself a few minutes to prep your starter and clean your work station.
After it cooled to 110°F, I added the culture just as normal. I used less than I normally would, hoping the batch might not be too strong.
Here is where I realized that I should not be starting this batch at 11 pm. If I truly wanted less sour yogurt, I would start in the morning and check it through the day to pull it when I like the flavor or consistency.
Anyways...I left the batch to go overnight as outlined in Getting Started with Yogurt. It turned out to be an ugly looking batch with a cratered top and watery texture.

The smell seemed about right to me, but my Review Board did not agree. I set the yogurt in the fridge to see if it would set over the next few hours (remember to dig a small crater in the center to collect whey).
After checking 3 hours later, I did not find much whey separating even though it felt very thin. I laid the jar on its side in the fridge to try again.
A couple hours turned sideways separated a LOT of liquid that I poured off without saving.
Well did it taste okay?
No.
What was the problem?
I could definitely taste the tea flavor. I could also distinguish between the two kinds of Earl Grey that I used. The lavender came out clearly in the Victorian London Fog. The batch was just way too sour and bitter to be very enjoyable. I ate a bowl of the plain Earl Grey without pouring off any whey and it was really a battle from start to finish. The Victorian London Fog was much easier to eat since I had poured off so much sour whey. I think this flavoring would have gone better if I went for a much shorter fermentation and kept at a slightly lower temperature (maintaining a similar volume of starter).
An important note about milk: Milk will separate into curds and whey when it is too acidic (this is how you make ricotta, which I'll write about someday). The tea will definitely add a little bit of acid, but apparently not enough to separate while it is heating. I think it must be separating during culturing because of the acid, but I doubt any pH strips I could find will be sensitive enough to tell (also you can't very well use the strips on opaque solutions).
Moving forward
After making more plain yogurt I got sick of fiddling with the temperature every time so I did some tests with water instead of milk. I had been using plates to separate the ceramic dishes so the vapor would escape and heat up the mason jars more directly, but this backfires whenever I open up the cooler. Since condensation covers the entire inside of the cooler, opening the lid cools the jars and the styrofoam each time (remember that evaporation removes energy from wherever the liquid water came from). I started using the correct lids for the ceramic dishes and this helped keep the temperature more consistent: now the heat was transferred mostly by convection in the air with no change from condensation.
Batch 2
I took my notes from the previous attempt and tried to make it a bit less tart. I steeped the tea for a shorter amount of time when it was hot, choosing to use a bit more instead for stronger flavor.
Most of my batches of plain yogurt lately have been a little tart for others so I have made sure to practice toning it down a little bit. The timing for more agreeable yogurt is more difficult since I cannot leave it to culture overnight. 6-7 hours is just of time for it to mature before refrigeration. With my tests on water I found the right amount of boiling water that would bring the cooler to 124°F max in the air, but would bring the yogurt to no more than 114° or 116°. About 1.25 L of boiling water would take the yogurt from 105° (normal temperature after inoculating and mixing) to a safe maximum and let it cool down slowly.
This batch didn't look remarkable after culturing, no pitting in the surface this time, and not a whole lot of whey separation before refrigeration. After refrigation I decanted a small amount of whey and blended the yogurt. It was much more desirable this time and I had no trouble digging in.
I think that Earl Grey is NOT the right choice for a tea flavored yogurt. I will try chai next, possibly green tea or chamomile (whichever I have the most of).
- Details
- Category: Yogurt
First Batch of Homemade Yogurt
I loosely based this first attempt off the Bon Appétit video. The main steps for this are shown below. I have made yogurt before with my neighbor, Eric Mayer, but did not have the same convenient setup that he has. His setup includes a cooler with a temperature monitor and he uses a pot of hot water as a heat source. I will attempt to do something similar, but using my oven to insulate.
I started with Organic Whole milk that was pasteurized normally. I looked at getting ultra-low pasteurized, but there was none left. I am assuming this will work fine.
My active yogurt culture is from ALDI's SKYR yogurt. They did not have plain, but the flavors aren't strong so that should not be an issue either.
Following the video, I heated 4 cups of milk until it had a few small bubbles, this was at 198°F for me. I cooled the milk down to about 115°F removed one cup for mixing with the culture. Do this in a small bowl (plastic if you can so the temperature does not drop as much as it will in ceramic). I mixed the culture back into the main batch and distributed the warm inoculated milk into two wide-mouth mason jars, stirring each well.
My oven only goes down to 170°F so I preheated it to that and turned it off immediately after it reached temperature. I prepared a large pot of warm, not hot, water and put both the pot and the yogurt cultures into the oven after it had cooled to 135°F. I know the water is cooler than that, so it will absorb a lot of the heat so the yogurt culture does not die.
I checked the yogurt every 30 minutes for 2 hours and would turn the oven on quickly if I needed more heat.
After one hour, the yogurts were at 105°F.
At this point I decided to text my neighbor to give him an update...and learned a lot in short order. He said he would culture at 114° and I should up my temperature. He also leaves his overnight to culture at a lower temperature, but I plan to refrigerate mine overnight (not nearly as patient as he is...must be a trait you learn in your 50's). Instead of continuing to fiddle with the oven, I searched our basement and found a styrofoam cooler that would be more convenient. I boiled 1.5 liters of water and poured it into a ceramic dish to heat the two jars in the cooler. The styrofoam walls allowed me to monitor the temperature by poking a thermometer through to the inside. Since the soon-to-be yogurt was too cool, I maintained a temperature of 121° in the cooler for about an hour. The temperature dropped to 110° for both the incubator air and yogurt so I refreshed the dishes with fresh hot water and closed it up again.

I inoculated at 4:35pm, and kept it relatively warm before actually reaching the goal temperature of 114° at 8:00pm. The yogurt stayed warm until 11:30pm when I moved it into the fridge. It should set by morning...
Batch 1 Results
The yogurt set well enough by morning, but was still quite loose. I decanted as much whey as I could without taking the yogurt out of the container, total of only about a teaspoon per pint jar. The consistency was close to regular yogurt, not Greek, and the flavor was weaker than I hoped. It was still very good and worked well for mixing with granola. I will increase the culturing time and try to keep the temperature higher for the next batch.

The center had sagged and the yogurt shifted in the jar when tilted.
Batch 2
I followed the same steps as the first batch, using about two tablespoons of yogurt from the previous batch as a starter. Using homemade instead of storebought made for easier mixing into the milk, leaving almost no chunks while I poured into the jars. I prepared the styrofoam cooler with two dishes of boiling water and closed it up with the two jars. My thermometer read a maximum of 145°F after about 5 minutes. Because the yogurt started at less than 110°F, I figured it should still be at a safe temperature,
After 5 more minutes, I measured the temperature of the yogurt (being careful to keep the container closed as much as possible). 116°F was a bit high, but I had no doubt that the culture would be safe. To lower the temperature a bit I just left the lid partway off for 5 minutes before closing and wrapping the container with a down blanket for extra insulation.
I assumed the yogurt containers would be slightly warmer than the thermometer after reaching peak temperature, so once the thermometer reached 106°F I refreshed the hot water (not using boiling this time) and left the container to sit overnight, wrapped in a blanket.
Nine hours after refreshing the water the container was at 86°F and the yogurts were just a tad warmer. I did not separate the whey yet, I put the jars directly into the fridge to set for 6 hours.
Batch 2 Results
 Way better! Compared to the first attempt, the yogurt has much more structure and did not shift when tilted.Pouring off the supernatant left a much thicker yogurt than the last batch! It was still more watery than regular Greek yogurt, but this is closer to my goal. I asked Mayer his thoughts and he recommended a Whey Separator/Cheese Maker that could be used to either make very thick yogurt, or just remove a bit of moisture. I may try this later, but the consistency of this batch works for me.
Batch 3
After sharing the first batches with my roommates, they commented that it was a bit sour. I agree that it has a strong yogurt flavor, but I am gonna try a few more batches before making any big changes to the time. I like how sour it is since I normally put a lot of granola with it.
Mayer says that the best strategy is to start a culture in the evening and let it run overnight, cooling down over time. With this batch I set the temperature to 115°F and covered it with a few down blankets. No peeking! No checking the temperature!
Batch 3 Results
Not much different. The consistency is WAY better now, but the taste is still very strong. This method also is much easier to attain consistent results. To try to reduce the sourness, I have started to drain the whey as it sits in the fridge. By taking a large scoop from the center of the jar, I can give some room for the liquid whey to flow into. Each day, I can collect a small divot-full of whey that is easily drained off. I tasted some of this liquid and WOW does it have some zing to it...
So what's the plan?
I am happy with the consistency I get from leaving it overnight after starting at the right temperature. I wish it were just a tad less sour, but that probably won't change until I can get a whey separator. Since we are in self-isolation for COVID-19, I'm gonna try not to order too many things online.
I will try a few flavors, but generally I think this plain yogurt suits my uses well and is super simple to keep making!
When I share with others, I make sure to shorten the incubation time to about 6 hours. This makes for a much less tart yogurt without needing to separate the whey...just blend and go!