So you probably saw a few YouTube videos about making kombucha or you've gotten sick of paying $3 per bottle.
Either way, brewing kombucha isn't complicated, but we sure can make it that way.
You definitely need some supplies to get going, but it is all pretty accessible. I have a Shopping List to give some examples, but finding a nearby brewing supply store is a great strategy to find what you need. I was able to get some supplies from a friend, but that isn't always the case. If you want to jump right into seeing what I did, take a look at my kombucha log.
Finding a SCOBY/Starter culture
"There is something immensely satisfying knowing that I have a literal army of microbes, each working for me free-of-charge!" - Mayer-san
A SCOBY (Symbiotic Culture Of Bacteria and Yeast) is the life force of kombucha. The bacteria consume sugar and alcohol to create acetic acid (responsible for the vinegar taste) and the yeast produces alcohol and carbon dioxide. Both need to be present in significant quantities to process your sweet tea into kombucha. It is possible to create a new SCOBY "child" from a bottle of kombucha, but that isn't always reliable (read here on how that can be done). I wanted to get a SCOBY from a local brewery, but after calling around I found that wasn't an easy option. I ordered a starter from The Kombucha People and was surprised how large the pellicle was! It also came with enough starter liquid to make one gallon.
The directions from the packaging (below) matched closely with what I had seen online, so I just went with it. I don't have a wide opening jar, but a narrow-mouth 3-gallon carboy, so I had to cut my SCOBY in half for it to fit inside...that's okay!
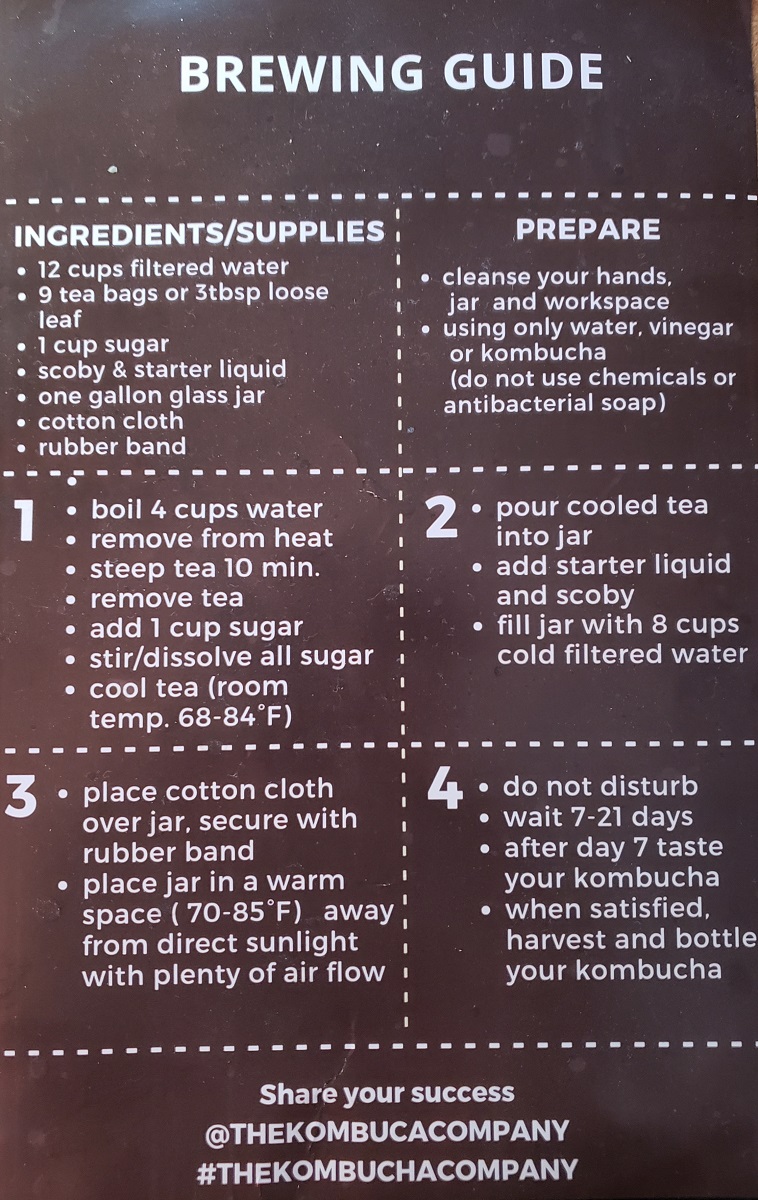
Where to keep it
You want your kombucha to hang out a little above 80°F. Here is a closer look at the relationship with temperature. I started with mine near a heater vent in the winter to add some extra heat, but wanted a temperature controller as soon as I could manage. The first several cycles were all with it sitting near the heater and I had no problem with mold or slow fermentation. Make sure to keep it out of direct sunlight, but a bright room is okay (all your dark rooms are probably quite cold anyway).
Every reference I see says 7-21 days of fermentation...that seems like a long time
It is a long time! If you are getting into this since you drink a lot of booch from the store, you are probably used to strong flavors with a good deal of sweetness. There was no way that I was waiting more than a week to try my first pull...so I tested it after exactly 7 days. It was delicious! Way better than expected for 'unflavored' tea (the flavor will heavily rely on what black tea you use as a base). I had certainly planned on flavoring every batch with a second fermentation, but could've kept the first batch unflavored and been very satisfied.
Unless you are looking for a very strong acidic flavor, or a heavier yeast flavor than you get in 7 days, one week is probably close to enough. You can always add sugar after you ferment to adjust for the acidity you achieve. After that first batch, I have stayed mostly on schedule for feeding and pulling product every 3 or 4 days.
The Second Fermentation (F2)
To bump up the zippiness of your kombucha, you should do a second fermentation that increases the pressure of the container instead of draining it all. To get carbonation (dissolved CO2) you need to keep the kombucha in a strong container with a good lid for a few days. GT's Kombucha from the store comes in great bottles if you don't feel like purchasing flip-top bottles. These are screw top and can get extremely tight with pressure, and also are not as safe as other options but make for a good start.
You can find my attempted flavors here. Add whatever fruit or juice you want to flavor with and add 1 tsp. sugar per pint to maintain activity. The culture present in the liquid (don't add any SCOBY) will generate carbon dioxide and increase the pressure in the bottle so some of the gas will dissolve in the liquid and carbonate the kombucha. Three or four days is normally plenty of time, and you can pop the bottles in the fridge to dissolve more gas in the liquid. The culture will have very little activity in the fridge so don't worry about them exploding if they are well below room temperature.
Storage and Time Frame
Once you complete the second (optional) fermentation, you can store your kombucha for quite a while. It will happily sit in the fridge or even at room temperature for several days before changing flavor at all. The culture should stay healthy for much longer, but the risk for contamination increases if you leave it at room temperature for too long. The bottles do not have an abundance of bacteria and yeast like the main fermenter does, so competition from outside sources is more likely. Chances are you will want to finish your bottles before they even start to go bad anyway.
Pulling a harvest into a half gallon growler is much simpler than individual bottles so I prefer to only flavor one large container. This is not convenient for travelling with a drink, but I just pour from the growler into a bottle whenever I feel like it. Using a large container will mean less fizz (opening more often) but saves time for flavoring.
Continuous or batch fermentation?
You can produce a lot of kombucha consistently with continuous fermentation because you could harvest just about any day and have a well progressed culture. The sugar will vary day to day and will be very high after a refill, but the age of the culture is more consistent than with a batch operation. For batch operation you could empty and refill your vessel every week or two and save a small amount of starter liquid, but that means you are locked into waiting most of that time for a taste. I have been happier pulling a fraction of my main fermentation every few days and refilling than I would be operating batch-wise and having to wait longer between harvests.